
Building a gable roof over your deck transforms an ordinary outdoor space into a year-round retreat. Suddenly, summer rain or harsh afternoon sun no longer sends everyone scrambling indoors. Homeowners who add a proper gable-roofed covered deck increase their usable living area by 200–400 square feet, according to the U.S. Census Bureau’s latest American Housing Survey. Moreover, the National Association of Home Builders reports that outdoor living projects deliver among the highest joy scores for homeowners. Therefore, if you love DIY and want maximum curb appeal plus real functionality, keep reading. This detailed guide shows you exactly how to construct a beautiful, strong gable roof over an existing deck in 2025.
Why Choose a Gable Roof for Your Deck Cover?
A gable roof, with its classic triangular shape, remains the most popular choice for deck coverings across America. First, it sheds water and snow far better than flat or shed styles. Second, the steep pitch creates excellent ventilation, reducing heat buildup underneath on hot days. Additionally, the open gable ends give you endless design options—from screened walls to decorative timber trusses that make your backyard the envy of the neighborhood.
Planning and Preparation Before You Start
Successful projects begin long before the first nail. Start by checking local building codes and obtaining permits. Most municipalities require engineered drawings for any attached roof structure over 100–120 square feet. Next, decide whether you want a freestanding roof or one attached to the house ledger. An attached version transfers some load to the house, while freestanding needs extra posts and footings.
Consider roof pitch too. Common pitches range from 4:12 to 12:12. Steeper pitches (7:12 or greater) look more dramatic and handle heavy snow loads beautifully. However, they also require longer rafters and more material.
Tools and Materials You’ll Actually Need
Gather everything upfront to avoid mid-project trips. Essential power tools include a circular saw, reciprocating saw, impact driver, and 4-foot level. For safety, invest in a good harness system if you work above 6 feet. Materials typically consist of pressure-treated 6×6 posts, doubled 2×10 or 2×12 beams, 2×8 or 2×10 rafters, 5/8-inch OSB or plywood sheathing, ice-and-water shield, architectural shingles, and metal drip edge.
Step 1: Lay Out and Pour Concrete Footings
Accurate footings prevent future leaning or sinking. Begin by marking post locations with batter boards and string lines. Most codes require footings 12 inches in diameter and below the frost line—often 36–48 inches deep in northern states. Use sonotubes and 3000-psi concrete with rebar pins. Allow at least 48 hours of curing time before setting posts.
Step 2: Install Structural Posts and Beams
Set 6×6 posts with galvanized post-base anchors. Plumb each post in two directions, then brace temporarily. Double up beams (usually 2×10 or 2×12) and secure them atop the posts using hurricane ties or post caps. Consequently, beams must be perfectly level; even a 1/8-inch difference compounds across the span.
Step 3: Attach the Ledger Board to the House (For Attached Roofs)
Never skip proper flashing here. Remove siding 8–10 inches above the deck joists. Install metal Z-flashing, then bolt a pressure-treated 2×10 or 2×12 ledger with ½-inch galvanized lag screws every 16 inches in a staggered pattern. Moreover, space lags no farther than 2 inches from each end. This connection carries roughly half the roof load, so precision matters.
Step 4: Frame the Gable End Walls
Gable roofs need triangular end walls. Build these on the deck first, then tilt them up. Use 2×6 lumber for king posts and common studs at 16 inches on-center. Add diagonal bracing until the main rafters go in. Once both gable ends stand plumb and square, connect them with a ridge board—typically a 2×12 or engineered LVL.
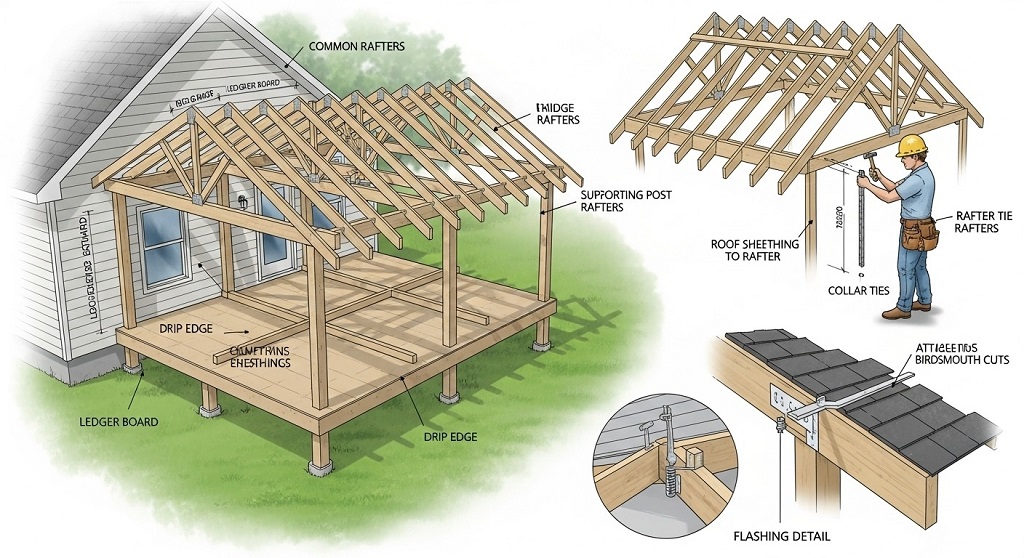
Step 5: Cut and Install Common Rafters
Accurate rafter layout separates amateurs from pros. Use a construction calculator or rafter tables for exact lengths. Mark the birdsmouth notch so the rafter sits flush on the beam or wall plate. Install hurricane clips at the top and bottom of every rafter. Additionally, add collar ties every fourth pair (usually 2×6 at the lower third) to prevent ridge sag over time.
Step 6: Add Outlookers and Gable Overhangs
Outlookers (sometimes called lookouts or outriggers) create the classic gable overhang. Nail 2×4 or 2×6 flatwise from the first interior rafter out to the fly rafter. Space them 24 inches on-center. Then install fly rafters parallel to common rafters and barge rafters along the gable edge. This step gives you that beautiful shadow line everyone admires.
Step 7: Sheath the Roof with Plywood or OSB
Start sheathing at the bottom edge. Use 5/8-inch or thicker panels with H-clips between rafters. Stagger joints and leave a 1/8-inch gap for expansion. Nail every 6 inches along edges and 12 inches in the field. Proper sheathing ties the entire frame together and provides critical shear strength.
Step 8: Install Underlayment and Ice-and-Water Shield
Modern codes often require ice-and-water shield along eaves, valleys, and at least 3–6 feet up from the wall line. Roll it out smoothly and overlap 6 inches. Then cover the rest with 30-pound felt or synthetic underlayment. These layers prevent wind-driven rain from sneaking under shingles.
Step 9: Add Drip Edge, Shingles, and Ridge Vent
Install metal drip edge along eaves first, then over the underlayment at rakes. Begin shingle courses with a starter strip. Maintain proper exposure—usually 5 to 5⅝ inches for architectural shingles. Cut ridge vent slots if you use that system, then cap with ridge shingles bent over the peak. Finally, seal every nail penetration on the ridge.
Finishing Touches That Make It Look Professional
Soffit and fascia complete the polished appearance. Many homeowners choose vented vinyl soffit panels for low maintenance and excellent airflow. Add 2×6 or 2×8 fascia boards wrapped with aluminum coil stock in your chosen color. Consider installing recessed LED cans or ceiling fans while everything remains open—running wire later becomes a nightmare.
Common Mistakes and How to Avoid Them
Homeowners often undersize beams or skip proper flashing. Another frequent error involves incorrect birdsmouth cuts that weaken rafters. Always double-check span tables from the American Wood Council. Furthermore, never nail sheathing only at the edges; field nailing prevents buckling. Finally, don’t forget to flash where the roof meets the house siding—this single detail prevents 90% of deck roof leaks.
Maintenance Tips for Your New Gable Roof Deck Cover
Inspect annually for loose shingles or flashing separation. Clean gutters twice per year to prevent ice dams. Trim nearby trees that overhang the roof. A quick 30-minute walk-around each spring catches small issues before they become expensive repairs.
Related Topics: How to make mugs a meaningful gift
Conclusion
You now possess every detail needed to build a stunning, code-compliant gable roof over your deck. From concrete footings to the final ridge cap, each step builds on the last to create a structure that will serve your family for decades. Start sketching your design this weekend, pull those permits next week, and soon you’ll enjoy morning coffee protected from the rain while watching birds in your private outdoor room. Grab your tape measure and turn that bare deck into the backyard oasis you’ve always wanted—your future self will thank you every single day.
Related Topics: How Many Rows in Td Garden Balcony
FAQs
How long does it take to build a gable roof over a deck?
A competent DIY team with two or three people typically finishes a 12×16-foot roof in 5–8 weekends, working part-time. Professional crews often complete the same project in 4–6 days.
Do I need an engineer’s stamp on my plans?
Most jurisdictions require stamped drawings for attached roofs over 10–12 feet wide or in high-wind/snow zones. Freestanding structures sometimes avoid this requirement under 200 square feet.
Can I use metal roofing instead of shingles on a deck gable roof?
Absolutely—metal stands up better to tree debris and lasts 40–70 years. Just ensure you install solid decking (no spaced sheathing) and proper underlayment to reduce noise.
What is the best roof pitch for a deck cover?
A 6:12 to 8:12 pitch offers the sweet spot between water shedding, headroom, and material efficiency. Shallower pitches work in dry climates; steeper ones excel where heavy snow falls.
Should the new roof match my house roof exactly?
Matching shingles and color creates seamless curb appeal, but contrasting can make an architectural statement. Either approach works if flashing and transitions remain watertight.
References
- American Wood Council Span Tables: https://www.awc.org/codes-standards/spantables
- International Residential Code (2021/2024 editions) Roof Sections
- U.S. Census Bureau – American Housing Survey 2023
- Fine Homebuilding Magazine – “Building Gable Roofs Over Decks” archives


Average Rating