
Mole negro, often called the king of moles, is one of the most complex and revered dishes in Mexican cuisine. Originating from Oaxaca, this sauce is a true labor of love, famous for its deep, dark color, and an incredible depth of flavor that balances smoky, sweet, savory, and spicy notes. Making it at home can seem intimidating, with ingredient lists that often top thirty items. However, the process is a beautiful culinary journey. It connects you to a rich tradition of food culture, a passion celebrated by culinary enthusiasts at Houston Bamboo House. This guide will demystify the process, breaking it down into manageable steps.
While the journey is long, the reward is a sauce so profound it can transform a simple piece of chicken or turkey into a world-class meal. It’s a dish reserved for celebrations, and mastering it in your own kitchen is a celebration in itself. There are many variations, as every family in Oaxaca has its own prized method. If you are searching for a specific, traditional guide, this mole negro recipe offers a fantastic look into the dish’s authentic roots. This article, however, will walk you through the fundamental techniques and components, empowering you to create your own stunning version at home.
What Makes Mole Negro So Special?
Mole negro is the darkest and most intricate of the “seven moles of Oaxaca.” Its complexity comes from a meticulous balance of ingredients from different categories: chiles, sweets, sours, spices, and thickeners.
It is much more than just a “chocolate sauce.” In fact, chocolate is only one small component. The signature black color and smoky flavor do not come primarily from chocolate. Instead, they come from the careful charring of specific ingredients, particularly the seeds of the chiles and a burned tortilla. It is this unique, deliberate use of carbon that gives mole negro its name, its color, and its hauntingly delicious taste.
The process is time-consuming. There is no shortcut. Each group of ingredients must be prepared separately—toasted, fried, or roasted—before being combined and ground into a paste. This paste, known as the recaudo, is then fried and simmered with broth for hours. This long, slow cooking process allows the flavors to meld, creating a final sauce that is smooth, layered, and unforgettable.
Gathering Your Ingredients: The Mole Negro Pantry
Preparation is everything. Before you begin cooking, you must gather your ingredients. Having everything measured and ready, a process known as mise en place, is crucial.
The Sacred Chile Trio
The base of the mole’s flavor comes from dried chiles. You cannot substitute these.
- Mulato Chiles: These provide a deep, slightly sweet, and chocolatey flavor.
- Pasilla Chiles: Also known as chile negro, these add a rich, fruity, and slightly sharp flavor. They are key to the color.
- Ancho Chiles: These are dried poblanos. They offer a mild, sweet, and fruity base.
- Chipotle Meco (Optional): Many recipes include one or two smoked chipotles for an extra layer of smoke and heat.
The Sweet and Sour Elements
This is where the balance comes from.
- Fruits: Ripe plantain and a handful of raisins (or prunes) add natural, subtle sweetness and body.
- Aromatics: White onion and plenty of garlic form the savory foundation.
- Tomatoes and Tomatillos: These must be fresh. They provide the essential acidic brightness to cut through the richness.
- Sugar: Piloncillo (or dark brown sugar) is used for a molasses-like sweetness.
- Chocolate: Use Oaxacan chocolate if you can find it. It is traditionally prepared with sugar, almonds, and cinnamon. If not, a good quality dark (70% or higher) bittersweet chocolate will work.
Nuts, Seeds, and Spices
These ingredients provide texture, richness, and aromatic complexity.
- Nuts: Raw, unskinned almonds and pecans (or peanuts) are most common.
- Seeds: Raw sesame seeds and pumpkin seeds (pepitas).
- Spices: You will need whole spices for the best flavor. This includes Mexican cinnamon (canela), whole cloves, allspice berries, and black peppercorns.
- Herbs: Dried avocado leaves (hoja santa) are traditional and add a unique anise-like flavor. Dried oregano (preferably Mexican) is also essential.
Thickeners and The “Negro” Base
These are the final, critical pieces.
- Thickeners: A slice of stale bread (like a bolillo) or a handful of simple animal crackers.
- The Black Components: This is the secret. You will use the seeds from all the dried chiles you prepared, plus one or two stale corn tortillas.
- Fat: Lard (manteca) is traditional and adds an unmatched flavor. However, a neutral vegetable oil will also work.
- Broth: A high-quality, homemade chicken or turkey broth is non-negotiable.
The Step-by-Step Guide to Mole Negro
We will divide the process into six key stages. Work methodically, and keep your ingredients separate after preparing them.
Step 1: Prepare the Chiles
This is the most important foundation.
- Clean and De-seed: Wipe all the dried chiles clean with a damp cloth. Using kitchen shears, cut the stems off. Slit the chiles open lengthwise and carefully remove all the seeds and veins.
- Crucial Step: You must save all the seeds. Place them in a separate bowl.
- Fry the Chiles: Heat a generous amount of lard or oil in a heavy skillet over medium heat. Working in small batches, quickly fry the chile skins for 15-30 seconds per side. They should become fragrant and puff slightly. Do not let them burn, or your mole will be bitter.
- Soak the Chiles: As the chiles are fried, place them in a large bowl. Pour just enough hot water (or broth) over them to cover. Let them soak for at least 30 minutes, or until they are very soft and pliable.
Step 2: Toast the Nuts, Seeds, and Spices
This builds the aromatic layers. Use a dry skillet or comal over medium-low heat.
- Nuts and Seeds: Toast the almonds, pecans, pepitas, and sesame seeds in separate batches. Stir constantly until they are fragrant and lightly browned. Sesame seeds will pop when they are done. Set each ingredient aside in a large “toasting” bowl.
- Spices: Briefly toast the cinnamon stick, cloves, allspice berries, and peppercorns for about 30-60 seconds, just until fragrant. Add them to the toasting bowl.
- Herbs: Add the dried avocado leaves and oregano to the hot pan for just a few seconds. Add them to the bowl.

Step 3: Cook the Aromatics, Fruits, and Thickeners
Using the same skillet you fried the chiles in (add more lard if needed), you will fry the next set of ingredients.
- Aromatics: Fry the onion and garlic cloves until soft and lightly caramelized. Add them to a new, separate “blending” bowl.
- Fruits: Fry the sliced plantain until it is dark golden brown. Add it to the blending bowl. Fry the raisins for just a minute until they puff up. Add them to the bowl.
- Thickeners: Fry the piece of bread or the animal crackers until golden brown. Add this to the blending bowl.
- Roast: On a dry comal or under your oven’s broiler, char the tomatoes and tomatillos until their skins are blackened and blistering. Add these directly to the blending bowl.
Step 4: Create the “Negro” Base
This is the defining step. Do this in a well-ventilated area, as it will create a lot of smoke.
- Burn the Seeds: Place the (previously saved) chile seeds in a dry, heavy skillet over high heat.
- Stir constantly until they turn completely black and are smoking heavily. They must be carbonized. This is not “toasting”; it is “burning.” This is the source of the color and smoky flavor.
3Such. Burn the Tortilla: Place the corn tortilla directly on the burner or in the same hot skillet. Let it burn until it is black and brittle, like charcoal.
- Grind: Transfer the burned seeds and the burned tortilla to a spice grinder (or a molcajete if you are traditional) and grind them into a fine black powder. Set this powder aside.
Step 5: Blend and Strain (The “Recaudo”)
You now have several bowls of prepared ingredients. It is time to turn them into the mole paste, or recaudo. You will need a powerful blender.
- Blend the Chiles: Drain the soaked chiles, but reserve their soaking liquid. Place the chiles in the blender with just enough of the reserved liquid (or fresh broth) to get them moving. Blend until you have a perfectly smooth, deep-red paste.
- Strain the Chiles: This is not optional. Push the chile paste through a fine-mesh sieve into a large, clean bowl. This removes any tough bits of skin and ensures a velvety texture.
- Blend the Other Ingredients: Add all the items from your “toasting” bowl (nuts, seeds, spices) and your “blending” bowl (aromatics, fruits, thickeners, tomatoes) to the blender. Add a cup or two of chicken broth. Blend until completely smooth.
- Strain Again: Strain this second mixture through the same fine-mesh sieve, into the same bowl as the chile paste.
You now have one large bowl containing your strained, uncooked mole paste. Stir in the black powder from the burned seeds and tortilla.
Step 6: The Final Cook (The “Sazón”)
This final stage is where the magic happens. It requires patience.
- Fry the Paste: Heat a large, heavy-bottomed pot (like a Dutch oven) over medium heat with a few tablespoons of lard or oil.
- The Sazón: Carefully pour the mole paste into the hot oil. It will splatter violently, so be cautious. This initial frying of the paste is called the sazón, and it is essential for developing the flavor.
- Stir Constantly: Stir the paste without stopping for 10-15 minutes. It must be in constant motion to prevent it from scorching on the bottom of the pot. You will see the paste darken and thicken.
- Add Broth: Begin adding the chicken broth, one cup at a time, whisking continuously. The paste will seize up at first, but keep stirring and adding broth until it loosens into a sauce. You will likely use 8 to 12 cups of broth.
- Simmer: Once all the broth is incorporated, add the piloncillo (or sugar) and the chocolate. Stir until they are dissolved.
- The Long Cook: Bring the mole to a simmer, then reduce the heat to low. Let it cook, partially covered, for at least 2 hours. Many grandmothers will say 4 to 6 hours is better. The longer it simmers, the more the flavors will meld.
- Season: Stir the mole frequently during this entire time. Taste it and adjust the seasoning. It will almost certainly need salt. It may need more sugar (if too bitter) or a tiny splash of vinegar (if too flat).
How to Serve Your Mole Negro
Your mole is ready when it is dark as night, fragrant, and thick enough to coat the back of a spoon.
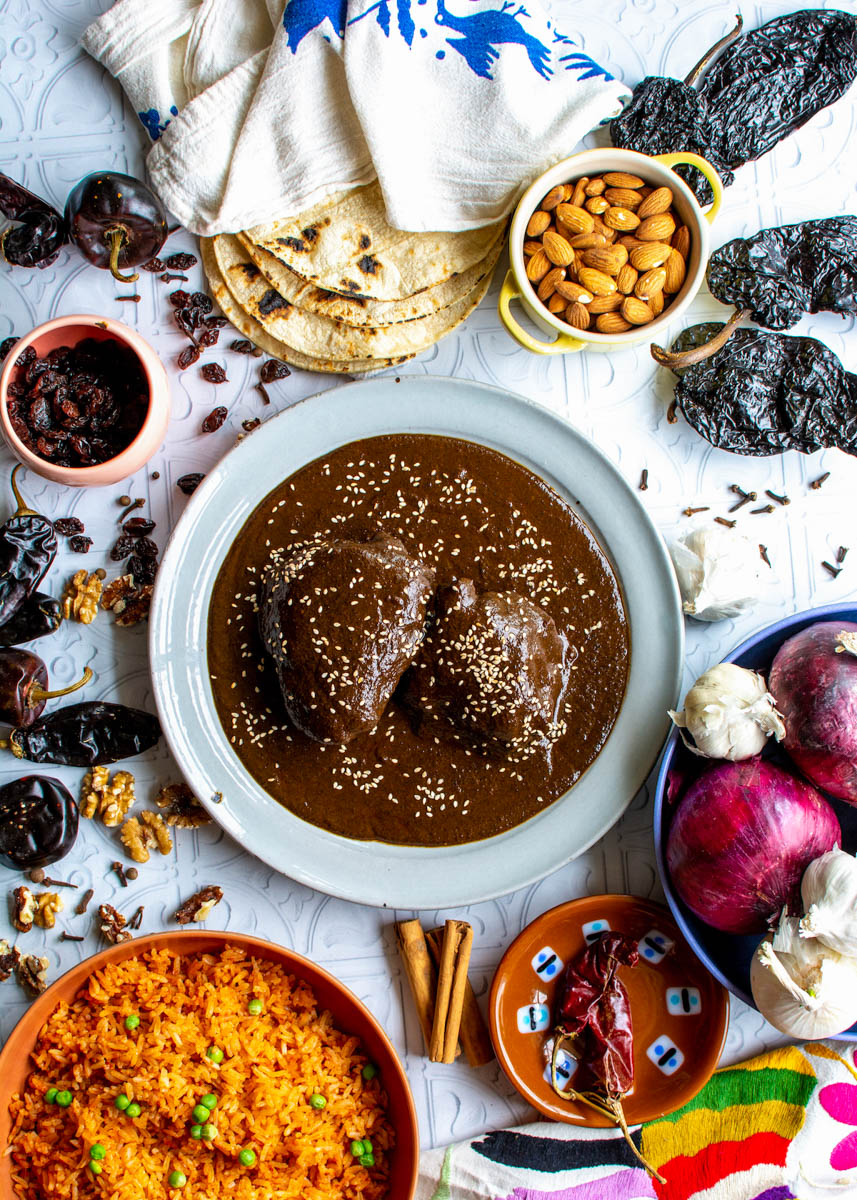
Traditionally, mole negro is served over poached or roasted turkey or chicken. Ladle the sauce generously over the meat. It is almost always accompanied by white rice and fresh, hot corn tortillas for sopping up every last bit of sauce. Garnish the dish with a sprinkle of toasted sesame seeds.
A fantastic tip from seasoned cooks: mole is always better the next day. The flavors need time to rest and fully integrate. Make it a day ahead, let it cool completely, and store it in the fridge. Reheat it slowly, adding a little more broth if it has become too thick.
Conclusion
Making a true mole negro from scratch is more than just following a recipe; it is an act of dedication. It is a process that takes time, patience, and a long list of ingredients. However, the reward is one of the most sophisticated and delicious flavors in the culinary world.
From carefully frying the chiles and toasting the spices to the crucial step of burning the seeds, each stage builds a layer of complexity. The final, long simmer transforms your work into a single, harmonious sauce. By mastering this dish, you are not just making a meal; you are participating in a deep and beautiful culinary tradition.
Frequently Asked Questions (FAQs)
-
Why is my mole negro bitter?
Bitterness usually comes from one of two things: you burned the chile skins (not the seeds) when frying them, or you did not add enough sugar or chocolate to balance the flavor. Taste and add more piloncillo or chocolate, and a little more salt, to balance the flavors.
-
Can I make mole negro in advance?
Absolutely. In fact, it is highly recommended. Mole negro tastes significantly better on the second or third day. It will keep in an airtight container in the refrigerator for up to a week, or it can be frozen for up to six months.
-
Do I really have to strain the paste?
Yes. This is a non-negotiable step for a high-end mole. Straining the chile skins and seed fragments is the only way to achieve the classic, velvety, and smooth texture.
-
Can I make a vegetarian or vegan mole negro?
Yes. The process is the same. Simply use a high-quality, flavorful vegetable broth instead of chicken broth, and use vegetable oil instead of lard. Serve it over roasted vegetables, tofu, or with tamales.
-
What is the difference between Oaxacan chocolate and regular chocolate?
Oaxacan chocolate (or Mexican chocolate) is traditionally a rustic-style chocolate. It is ground with sugar, cinnamon, and often almonds. This means it is less processed and more granular. If you use it, you may need less added sugar and cinnamon in your recipe. If you cannot find it, a dark bittersweet (70-85%) chocolate is a fine substitute.
Related Topics:
How to Fix a Toaster That Won’t Heat: A Step-by-Step Guide
5 DIY Kitchen Projects to Inspire You

Average Rating